Friday, October 30, 2009

Mushroom Cottage Pie

P1330754

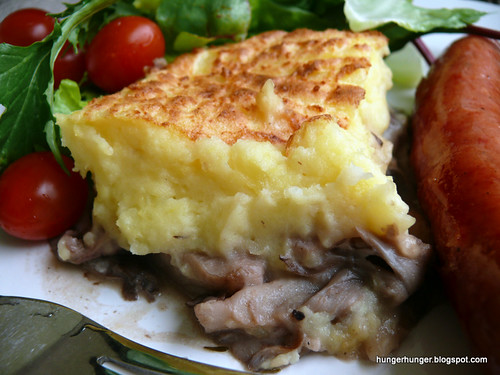
On a rare occasion of me sitting down in front of the TV recently, I watched Laura of French Chef At Home cook a vegetarian meal. Yesterday I was out with friends and we saw a big sack of fresh local shiitake mushrooms (make sure you get local shiitake because the ones from China can smell like sweat by the time they get here) and oyster mushrooms--the same mushrooms that Laura used for the mushroom pie, which had no lamb by the way so technically it isn't a shepherd's pie.

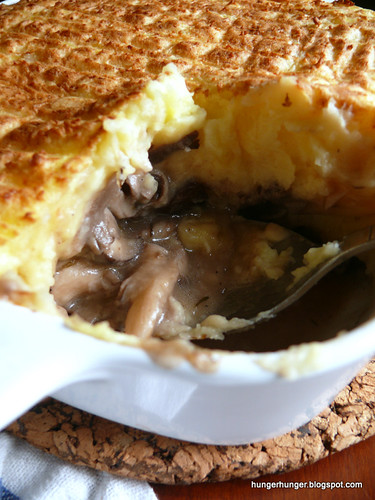
The resulting pie I baked, based on hurriedly scribbled ingredients (these days it isn't cool to give a list of ingredients on food programs *sigh*), was a hit. The mushrooms were meaty and delicious and the red wine gave a wonderful aroma and taste to the dish. I love this pie and although Wey prefers pies with meat in them, he still ate half the pie. I underestimated the amount of mushrooms needed so the pie was more mash than mushrooms but that was okay. I think the pie had a bit more gravy than Laura's but as the pie cooled, the gravy disappeared. We had Hungarian bratwursts and a leaf salad with the pie and it was good enough for a simple Thursday night dinner although by 11 pm I was hungry again. But I am determined to loose those 2 kgs by the end of November because the loss will make way for more food to be eaten in December! I know some people diet for a day or two for that special dinner or pair of skirt, but for me it's to make way for more food. Disgusting.

As I sat down to write this post, I googled for the recipe and found it listed as 'Mushroom Parmentier'. My recipe below is not far from the original except for the amount of mushrooms and I used cheddar instead of gruyere cheese. As usual I cut steps whenever I could; that's my bad habit. I think if I were to tweak this recipe, I'd add some cubed beef steak to it but then again it really is very good as it is. I'm sold on this Laura person; her recipes are simple to follow and delicious. If only she doesn't have that fun but irritating French cafe music on all the time.

P1330749
Mushroom Shepherd's Pie
500g mix of fresh shiitake & oyster mushrooms
1/2 red onion (or white since red is expensive), chopped
3 T butter
2 T olive oil
2 cloves garlic, chopped
1/4 cup red wine
1/4 cup chicken stock
1/2 t fresh or dried thyme (fresh is better)
salt & pepper to taste
1 T plain flour
1 T fresh parsley (I used Italian flat leaf), chopped

Mash
4 large potatoes, skinned n cut into cubes
2 T butter
5-6 fresh dairy cream (or milk)
1/2 t salt & some freshly ground pepper
50 g mature cheddar, grated

--boil the potatoes until tender. Drain n mash with all the ingredients using a potato masher or ricer. Adjust the amount of cream/milk to make the mash the consistency to your liking.

Prep: I do wash my mushrooms (top only, don't wash the underside) despite all the instructions telling me not to, and gently squeeze out the water. Trim off the stalks & tear the oyster mushrooms into smaller pieces and cut the shiitake into 1 cm thick slices.

Oven at 250 C.

1. Put 2 T butter into a frying pan, add 2 olive oil and fry the onions until transparent and soft. Add the mushrooms and garlic, fry for 1 minute. Add the red wine and fry until the wine is nearly gone in amount and fragrant (until it doesn't smell as strong as when it was added).

2. Add the stock, thyme, salt & pepper and let it cook for about 1 minute, stirring well.

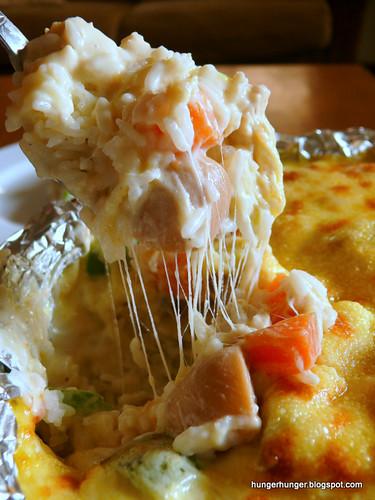
3. Knead 1 T butter with 1 T flour ('beurre manie'--what a clever way to thicken the gravy without ending up with lumps of flour!) and add to the mushrooms, stirring to dissolve the butter and flour. The sauce will thicken beautifully. Add the parsley, stir through and spoon the mixture into a gratin dish.

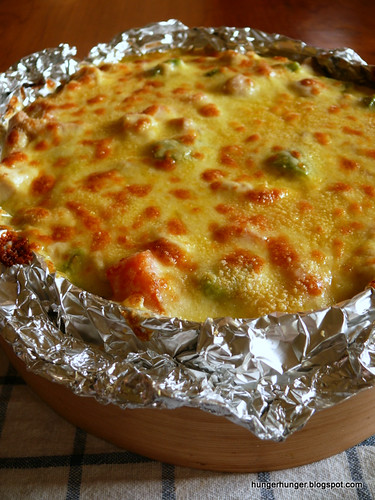
4. Spoon the mash over the mushrooms, level and pull a fork over to make a lattice pattern and bake at 250 C for 10-15 minutes until golden brown.

Serve hot.

Wednesday, October 28, 2009

Cheese Baked Rice A La King

P1330716
Cheese baked rice

You know the baked cheese-topped fried rice in dim sum baskets served in char chan tengs, Hong Kong-style fusion coffee houses? I was trying to make that dish, except I didn't want the usual fried rice topped with pork or chicken chop or luncheon meat. I thought chicken a la king, a dish we enjoy, would be good instead of fried rice but this dish goes to prove that the same thing served in a different style can be utterly disastrous. I don't know, you can try it out and tell me what you think. Maybe macoroni would work better than rice for this dish. You can still do the dish the char chan teng way, by frying up some rice with luncheon meat and mixed peas and carrots, top with a piece of pork chop or ham, and then top that with mozzarella cheese, cheddar & parmesan cheeses.

I didn't think I would blog about a recipe I didn't like. But who knows, some of you may like fusion food better than us. Wey, who disliked Chinese-Western fusion food, now hates it after eating this. And I feel the same too. Little kids may fall for it, thinking it is western. Yes, it might work on kids.

P1330706
Cheese Baked Rice A La King
3 cups Chicken a la king*, warm/hot
5 cups cooked plain rice or macaroni, warm/hot**
120 g mozzarella, grated
100 g parmesan & cheddar (or just one type of either cheese), grated

*make the sauce slightly thicker than usual for this dish

**or use fried rice, top with a chicken chop or pork chop or fried egg or fried luncheon meat or ham. Omit the chicken a la king.

1. Oven at 250 C, rack on upper half of oven.

2. Wrap a bamboo dim sum basket with foil, leaving an overhang wide enough to wrap the sides of the basket so that the basket won't burn.

3. Put the cooked rice into the basket, level it and then top with the chicken a la king. Make sure the chicken & sauce is level.

4. Sprinkle an even layer of mozzarella followed by the parmesan and cheddar, and pop into the oven for 3-4 minutes until bubbly and golden brown in some spots. Serve hot.

Monday, October 26, 2009

Spare Ribs With Sour Plums

P1330699

As a Martyr Mother, I usually steam pork spare ribs with black beans because that's the way the guys in my family like their ribs. But once in a while, Martyr Mother rears her ugly head and cooks ribs the way that SHE likes, with sour plums. The savory-sour ribs are so appetizing that I can eat a whole plate of ribs myself, and I usually do because the boys will leave it alone.

A friend once taught me to marinade spare ribs for steaming with lots of corn flour hours before steaming, so that the meat will be tender and smooth. Make sure too that the ribs are chopped (by your butcher) into bite-size pieces to increase their surface area for absorption of all those marinading ingredients.

I threw in some plum sauce just because I needed to finish off the jar I bought for making luo sang during Chinese New Year. Do you know that there's lots of sugar in plum sauce? I was horrified to find that the plum sauce had crystalized and the lid was glued tight with sugar. I had to put the lid to a flame before it would open. And as expected, the plum sauce overwhelmed the sour plums, making the dish sweet instead of sour. So please don't do what I did. Just keep to the sour plums.

sourplum ribs
Spare Ribs With Sour Plums
400 g pork spare ribs, in bite sizes (try chicken wings for kosher/halal dish)
4-5 sour/salted plums + 1/2 T pickling liquid
1/2 T chopped garlic
1 heaped T corn flour
3 t light soy sauce (I like Yummy House's)
1/2 t fine sugar
a few shakes of white pepper
1 t sesame oil
1 T shaoxin wine
1 T water

garnish: chopped spring onions & red chillies

1. Put everything into a heat-proof dish and mix well, crushing the sour plums coarsely. Leave covered in the fridge for at least 3 hours.

2. Get a pot/wok of water boiling, put the dish in and steam the ribs at high heat for 20 minutes. Garnish with chopped spring onions & chillies and serve hot. Goes well with plain rice.

Friday, October 23, 2009

Junior's New York Cheesecake

nycheesecake2
Junior's Fabulous New York Cheesecake

I am a New York cheesecake person and the denser the cheesecake, the better I like it. I've never made a New York cheesecake that I really liked because the results were always a semi-dense cake. I wanted a cheesecake that is so hard that I would have to scrape it off the spoon with my teeth and chew, not bite, before I wash it down with black coffee. Yes, that sounds like a hard cake and I like it that way.

There are almost no secret recipes anymore today. Take Junior's in New York, which serves 'The World's Most Fabulous Cheesecake', whose famous NY Cheesecake recipe is all over the internet. But with all those recipes, how do you know which is the one that will work? Some recipes from the net and cook books have disappointed and discouraged me. I think the popularity of food recipes blogs is dependent on the credibility of the blog writer. If you trust that writer is giving you a true and tried recipe, you will try her recipes out. I knew I could trust Tealady because like me, she tests and writes about her culinary experiences honestly. Tealady too walked a long road to finding her favorite cheesecake recipe, finally finding it in Junior's Cheesecake Cookbook, and she was so gaga over it that I printed her post, waiting for a lean moment in my life when I can indulge in one of my top favorite desserts. But the lean moment never came and I've waited too long so 3 weeks ago, I made my first Junior's NY cheesecake and it turned out so good that I couldn't salvage a piece for my blog photos; everybody had second and third helpings. Yesterday I bought a 2kg block of Philly cream cheese (the only cream cheese I use; Anchor cream cheese is cheaper but makes lousy cheesecakes) and baked 2 of the cheesecakes again.

This recipe is so good I didn't change much except reduce the sugar by 1/2 cup. I also creamed all the cheese in one go rather than in two batches but you don't have to cut corners like me. To get the cake as dense as possible, do not overbeat but whisk just enough to make sure the cheese is creamed and smooth. The best thing about this recipe is that you beat everything together. There's no separating and whisking of the egg whites and no difficult folding in of any ingredients. Junior's NY cheesecake has a sponge cake base, and since I have many failed sponge cakes in my freezer (I had a frightful weekend some weeks back when I just couldn't get my sponges right), I used a 2 cm thick sponge cake as base but the batter was so heavy that the sponge cake was flattened to nothing. I think a base is totally unnecessary for dense sponge cakes. I do love graham cracker bases but these days my guilt about eating such stuff prevents me from enjoying them and I find myself going for the cheesecake but discarding the base/crust so now I don't bother with them. In any case, I think bases are for commercial bakers to save on the real thing, the cheese. I've seen cheesecakes with a layer of sponge as thick as the cheese layer.

P1330633
Creamy and satiny...mmm..

My Documents13
Top left cake was baked using a bain marie, bottom cakes were not but turned out good. The bottom left cake had no cracks and the 'blemishes' were caused by the cling film which stuck to the cake during chilling.

I baked the first cheesecake the usual way, using a bain marie (water bath) but the cake still cracked. I read somewhere that dense cheesecakes, unlike fluffy soft cheesecakes, don't need to be baked bain marie so this time I put my cakes directly on the rack. The result was one cracked a little and one didn't, which proved to me that bain maries are more of a comfort to nervous bakers. However, the first cake fell evenly when it cooled while the ones I baked non-bain marie caved in quite a bit, but I don't think it was the lack of bain marie. I think I opened the oven door too many times to take photos and to check on the doneness, which is difficult when you have two cakes of different sizes baking at the same time. However, I may be wrong, as bain maries are supposed to not only prevent cheesecakes from cracking, they also keep the cakes moist. I overbaked the cakes, by a full 25 minutes, because I totally forgot about the cakes! The cakes were crumbly and drier than the first one I baked, so remember to set your oven alarm.

A cheesecake is easier to bake than a sponge cake. You must trust me and make this cake this weekend. This cheesecake and a cup of coffee made me felt blessed and happy. Many thanks to Tealady and Junior!

p.s. This cheesecake is still more Chicago than New York to me; I would like it to be denser. I think I may have over-whisked the batter. But still, it is an awesome cake which everybody who ate it loved. I found it rather difficult to slice cleanly. Does anyone have a good tip on cutting cheesecakes into neat slices without having to dip the knife into hot water?

nycheesecake1
Junior's New York Cheesecake

32 oz/1 kg Philadelphia cream cheese, softened at room temp
1 1/3 cups fine sugar
1/4 cup corn flour
1 T pure vanilla extract (I reduced to 3/4 T)
2 extra large eggs
3/4 cup heavy cream

1. Oven at 170 C (I used a lower temperature so that the cake will rise slowly). Recommended temp is 180 C.

2. Put 1/4 of the cream cheese, 1/3 of the sugar and all the cornstarch into your mixer bowl and beat at low speed with a butter whisk (for Kenwood machines, that would be the K-beater) until creamy, 2-3 minutes, scraping down the sides of the bowl several times.

Add the remaining cheese, 1/4 at a time, scraping down the sides of the bowl after each addition. Increase the mixer speed to medium and add the remaining sugar, vanilla,one egg at a time, beating well after each addition but do not over-beat. Lastly add the cream.

Or, you can add all the cream cheese into the mixing bowl of your mixer and beat at low speed until creamy, scraping down the bowl now and then. Add the sugar, vanilla extract,eggs and cream (in that order), whisking well at medium speed after each addition. The batter should be satiny-smooth. Do not over beat or the cake will be less dense.

4. Pour batter into a 9 "/23 cm spring form pan and bake bain marie for 1 hour 15 minutes or 10 minutes more. Do not bake longer even if the centre is soft and wobbly because it will firm up when the cake cools.

5. Remove the cake pan carefully, run a blade around the sides so that the cake won't crack as it cools and contract. Let it cool thoroughly, cover with cling film, and put into the fridge without removing the cake from the pan. Chill at least 4 hours or better still, overnight, before serving. You can serve with a compote of berries, which is perfect for it.

Fruit Compote: Just put some water and sugar into a small pot and when the sugar has dissolved, add the fruits and cook until softened.

Monday, October 19, 2009

Di San Xian (Earth Three Fresh)

P1330625

In western restaurants, you know you are getting a steak if you order 'tenderloin with bearnaise sauce'. Chinese restaurants do not name a dish by the ingredients like di san xian as 'brinjals, potato and bell peppers stir-fry'. Intriguing names such as 'Ants Crawl Up The Tree', which really is a mung bean noodles and minced meat dish, can fire up the imagination and make a boring dish otherwise. Some dishes have such descriptive names which you can almost imagine how the dish came about, such as 'Buddha Jumps Over The Wall', which sounds like something a track and field monk should eat but in reality only the king can afford. And if your host ever suggests a dinner of 'Phoenix and Dragon', please take my advice and decline dinner. One of my friends was invited to such a dinner when he visited his ancestral village in China in the days before any of us would venture into China. When the waiter lifted the huge silver lid, a chicken (the phoenix) rested in the middle of the large platter, with a snake (the dragon) curled around it. He ate it. I would prefer to drop dead. I think it was stories such as these that put me off from visiting China until 1999.

Di san xian literally means 'Earth three fresh' which really means three fresh things/veg from the earth, if you juggle those words a little. Di san xian is a common everyday dish in China but not in Malaysia. Di san xian originated from northern China, which explains the inclusion of potatoes which are seldom used as a stir-fry item in Southern Chinese cooking. I like to use young potatoes for this dish because they aren't as floury as the old potatoes. If you can't find brinjals, you can substitute with very young eggplants. Taiwan brinjals are best because they are thin-skinned, seedless and always tender.

I've eaten different versions of di san xian and since I prefer some sweet soy bean sauce in it, that's how I cook it. If you prefer a lighter version, omit the soy bean paste and use more light soy sauce. The secret to this dish is to fry each type of veg separately in plenty of oil and avoid adding liquid, which means a lot of patience is needed to fry the veg over low heat until they are cooked. If patience is not yet developed in you, then go ahead and use some chicken stock, but sparingly. The dish should taste fried, not steamed or boiled and there shouldn't be any gravy or sauce. Another way to not test your patience is to julienne the veg so they cook quickly.

Di san xian reminds me of Italian caponata. If you cut the ingredients into meaty chunks, they are like a cross between meat and veg, so even carnivores like my son Wey will eat this dish.

Di San Xian
1/2 each green and red bell peppers
1 large young potato
1 Taiwan brinjal
1/2 T finely chopped garlic
veg oil
1/2 T chopped garlic
1/2 T sweet Chinese soy bean sauce (I get mine from Shanghai)
1 t light soy sauce
3-4 T chicken stock if needed

Prep: If using young potatoes, it's ok to leave the skin on. Cut the potatoes into small chunky wedges. Do same with the brinjal but make sure it's cut longer and not too thick so that it can cook faster. Cut the peppers into diagonal pieces. For a neat presentation, try and cut all the veg about the same size.

1. Put 3/4 cup veg oil into a heated wok and fry the potatoes until light golden and cooked. Remove onto a plate. Fry the brinjals for about 1 minute, remove.

2. Pour all the oil away. The wok will still be coated with oil. Add the bell peppers & garlic to the unwashed wok, then when the peppers are half-cooked, add the potatoes and fry under low heat for a couple of minutes. Finally add the brinjals, the bean sauce and the soy sauce and fry for a minute. Usually a pinch of msg or chicken stock powder is added too. Fry well to mix and dish onto a serving plate. Serve hot.

note: if you find that your veg are burning and not fully cooked, lower the heat and add a tablespoon of chicken stock. Wait for the liquid to dry up before adding another spoonful if needed.

Wednesday, October 14, 2009

Shanghainese Winter Melon Soup

P1330583
Shanghainese winter melon soup
Some of the most popular Chinese soups I can think of are lotus root soup, winter melon soup, white carrot soup and watercress soup. These soups, which are simmered for at least 2 hours, are served in most restaurants. Every respectable Chinese housewife should be able to not just cook these soups, but cook them them well.

Chinese soups are easy to cook. Everything goes into the pot to be simmered for at least two hours or about four hours if it's double-boiled (soups are double-boiled in a ceramic tureen or crock which sits in a pot of water so the heat is indirect and very gentle, just like a bain marie). The Cantonese believe that 'long-boiled' soups invigorate and rejuvenate the body and people who have recovered from illness are made to drink lots of double-boiled soups.

Winter melon soup is one of my favorite soups, especially if the melon is the pandan-flavored winter melon. The whole house can be scented by the fragrance of the melon as the soup cooks. The most common way to cook winter melon soup is to simmer the soup with red dates, salted turnip and meat or bones, and the Cantonese will add a small handful of dried oysters although if a less robust but more refreshing soup is preferred, the dried oysters can be omitted. The Shanghainese winter melon soup is just as simple, but instead of dried turnip, salted young bamboo tips called "beeji" in Shanghainese and "bian jian sun" in Mandarin are used and Chinese ham replaces dried oysters. I've not found beeji in KK but they are found in Asian grocers in Australia and they keep well in the fridge. My daughter loves beeji like a dog loves bones. She's a true Shanghainese; they love bamboo. Beeji is crunchy-tender and fun to eat. It almost takes the limelight from the winter melon. I dig for the beeji in the pot more than I do the winter melon.

If you want a lighter, refreshing soup (Chinese soups are supposed to be such, to wash and clean the palate for the many varied dishes in a typical Chinese meal), a free-range chicken is best. I found a place to get REAL kampung chickens today (no, Yi, I didn't touch our pet chickens), and my soup turned out better than any I've made in a long time. I doubt that the kampung chickens sold in our wet markets are the real thing. They may be true kampung breed, but certainly not kampung-reared. Kampung-reared chickens are free to roam and feed on whatever they find while farmed kampung chickens are caged and feed on processed chicken feed. True kampung chickens have rather dirty-looking skin with lots of baby feathers still in the skin while farmed kampung chickens have smooth bald skin. True kampung chickens are also very skinny, weighing about 1.2 kg live. The truth will be revealed in the soup. Once you've tasted the real thing, you'll never go back to farmed chickens for your soups.

P1330575

P1330582

Shanghainese Winter Melon Soup
1 kg pork bones & meat or 1 x 1 kg kampung/village chicken, skinned
500 g piece of fragrant winter melon
100 g salted young bamboo tips, washed and soaked 10 minutes, repeat
a handful of red dates, washed
1 small piece (half a fist) of Chinese ham

Prep: The skin of the winter melon can be left on for extra fragrance but the Shanghainese don't seem to do that. Cut the melon into small chunks of about 4 cm squares. Trim off the hard end of the bamboo stem, if any. If using pork bones & meat, blanch them with boiling water.

1. Put the meat/bones into a pot, add water to cover with a clearance of about 5 cm. Add the ham, bamboo and red dates too and when the water boils, lower the heat until the soup simmers gently, covered.

2. After 1 1/2 hours, bring the soup to a rolling boil, add the winter melon and when the soup boils again, lower the heat and let the soup simmer gently for about 20 minutes, covered. Switch off heat and leave the pot covered.

3. Just before serving, re-heat the soup. Depending on how you like the soup and how much water has evaporated, you can add some water if necessary, but not too much or the taste will be diluted. There's no need to add salt as the bamboo and ham are salty.

Tuesday, October 13, 2009

Smoked Salmon & Asparagus Tart

salmon asp tart
Smoked Salmon & Asparagus Tart

Wey is writing his last paper this moment. He came home yesterday and chased the chickens (yes, chickens. I 'acquired' 4 kampung chickens last month. They are cute. They sleep in trees. Does anyone know how to make them sit on their eggs?), watched TV and chat on the computer. By 9 pm, I lost control. I had to nag. Motherhood makes a woman a nagger. "Are you ready for your KH (Life/Home Skills) exam?" I asked. "Easy peasy, I always score below 40 marks." "Oh, wow, that's 80%" "Mom, it's out of 60 marks." Right, great revelation. I made him sit down, with 2 Malay-English dictionaries on the table.

It is unfortunate that I've never really looked at his KH textbook. KH is a half credit subject and there's only one textbook. It is not a compulsory-to-pass subject so most students treat it as a waste of their time. I never look at ithe textbook because my BM level only helps me read letters from the government. I always tell my kids, and I mean it, that BM is a beautiful language (to which Wey would nod) and very easy to learn, if only we read and practise it. So there I was, going through the chapter on consumerism and checking every fourth word (by the way, what is berubal?), and getting more and more angry with Wey, who had his head on the table, and nodded just to keep me going. When I looked up at one point and saw he had his eyes closed, I just had it. (I won't tell you what I did, but Wey often tells me,"If we were in Canada, you'd be in jail for child abuse." Why isn't there a law for abused parents?) I wish I had spent time with him on this subject which I used to think was a waste of time but turned out to be very interesting and informative. KH is useful to learn and easy to score. I have to remind myself of the Chinese saying, "If the cow doesn't want to drink, how do you make it dip its head?"

Ah well. Let's cook. My fridge is acting up and the stuff in the bottom drawer occasionally freezes. I had a packet of smoked salmon that froze. After thawing, it was mushy and disgusting. So it went into this smoked salmon and asparagus tart which was good but not as tasty as this salmon bacon quiche, I thought. However, Wey loves it and thinks the salmon and asparagus combination is great and for someone who hates fish and loves bacon, that's a big surprise.

.salmon asp tart1

Smoked Salmon And Asparagus Tart

Pastry
1 1/4 cups all-purpose flour
1/3 t salt
125 g cold butter, in small cubes
5 T very cold water

prep: pre-heat oven at 180 C.

1. Sift flour and salt into a bowl. Use a pastry cutter to cut the butter into the flour, working the mixture until it becomes an evenly mixed crumbly mixture (I can never get them to look like fine breadcrumbs).

2. Add the cold water and use a fork to mix into a dough; do not overmix.

3. Chill for at least 1/2 hour.

4. Roll pastry into a large circle enough to cover the bottom and sides of a removable-bottom round tart pan of 9 1/2" or 24 cm, drap it over the rolling pin and transfer onto the pan. Trim excess edges.

5. Put a piece of foil on the tart base, add beans or even metal spoons to weigh down the pastry so it won't puff. Pop tart into oven for 10 minutes, then carefully remove the weights and the foil and let tart toast another 15-20 minutes. Remove from oven.

The Filling
1 large egg + 2 egg yolks
200 g smoked salmon, torn into small pieces
1 cup heavy cream
pinch of salt and pepper
pinch of fresh dil l (optional)
12 spears of thin asparagus
1 heaped T grated sharp cheddar

prep: snap the hard ends off the asparagus; discard. Blanch the asparagus for a few seconds, drain. Trim the asparagus to the radius of your tart. Snip the trimmed stems (not the spear ends) into 1" lengths.

1. Whisk the eggs, add the heavy cream, dill, cheddar and seasoning and mix well.

2. Scatter the torn/flaked salmon & 1" asparagus trimmings on the tart base, pour in the filling and bake at 180 C for 10 minutes.

3. Arranged the blanched asparagus spears around the tart, like the face of a clock. Return to the oven for another 20 minutes.

4. Let the tart cool a little and firm up before cutting.


Thursday, October 8, 2009

Tonkatsu Last Night

tonkatsu1
Tonkatsu, shredded cabbage and carrot, wakame miso soup, peanut butter beans, plain rice and a couple of umeboshi (pickled plums)

Leave it to the Japanese to clone another country's dish and make it internationally popular. I'm talking about pork schnitzel, a traditional Austrian/Italian dish which the Japanese hijacked and called tonkatsu. Easy to cook and immensely delicious to eat (if oil is not your phobia), tonkatsu is simply thin slices of pork (or chicken, but that would be chicken katsu) breaded and deep-fried until golden. If served on a bowl of rice, it is katsu don. The traditional accompaniment is plain rice, thinly sliced cabbage and some pickles and a miso soup.

tonkatsu sandwich
If there are leftovers, I keep them for making sandwiches the next day, heating them up in the toaster oven. Tonkatsu sandwiches are very delicious and satisfying.

I usually use pork loin although some people may prefer the shoulder. Pork loin can be tough and dry, but you can overcome that by cutting the meat thinner, about 10 to 12 mm, and break up the fibers by whacking at the meat with a metal (do they come any other way?) mallet. Don't over-mutilate the meat though or the texture will be soft and 'powdery'. You can also use chicken breasts, and if you are lucky enough to live in a country with veal, you can use that too. I like to season the meat lightly with salt, pepper and soy sauce only but if you prefer to make your tonkatsu more flavorful, you can add minced garlic or garlic powder and even fish sauce.

About the panko or breadcrumbs, I am happy with our local Tastie brand which is cheaper and finer. Go Japanese if you must, but be prepared to pay 2-3 times more for plain old dry bread crumbs.

For the best tonkatsu, or anything deep-fried, the secret lies in the temperature of the oil. I don't fall for that oil palm sell and I'm happy with Canola oil. It's still fine even if it's oil from genetically modified rapeseed plants developed by a professor from my university (yeah, go Bisons go!). I test the temperature of the oil by stabbing a pair of wooden chopsticks into it. If the surface of the chopsticks sizzles immediately, the breaded cutlets go in, one after one. If you want make it a Japanese meal, do all the other side dishes first and apportion the individual servings before you fry. This is because it takes less than 2 minutes to cook and you should eat the tonkatsu while it's still hot, or at least warm. You should allow 2 big pieces per person.

For a more western version, add grated parmesan into the breadcrumbs mixture. Serve a tangy salad and some potatoes and that's an awesome meal, to me.

tonkatsu
Tonkatsu (about 4 servings)
500 g pork loin (chicken breasts for chicken katsu)
2 t light Kikkoman soy sauce
1/2 t salt
1/16 t white pepper
pinch of sugar (optional)

coating: 2 cups white breadcrumbs (panko), 1 cup corn flour, 1 large egg

1. Slice the pork/chicken breasts into 10 or 12 mm thick slices across the grain. This thickness is perfect for quick cooking and still gives a good bite. Use a mallet to tenderize the meat on both sides.

2. Season the meat with the remaining ingredients.

3. Dip the meat slice by slice into the cornflour to coat lightly, shake off excess flour. Now dip the flour-coated meat into the beaten egg, drip off extra egg and lay onto the plate of breadcrumbs, sprinkling more crumbs over the top. I like to use my left hand to hold the meat when dipping into the egg, then use my right hand to handle the coating. This way, my fingers won't be coated with breadcrumbs. Press the meat on the breadcrumbs to make them stick. Coat both sides.

4. Chill the coated meat for at least 1/2 hour. Good idea to get the side dishes ready now. Make sure you have a pickle (to cut the grease), a miso soup, plain rice and the finely cut cabbage. I use bottled tonkatsu sauce (very tangy) and ponzu sauce which I prefer on the cabbage as a dressing rather than dip for the meat.

5. Heat up 2 cups of veg oil (believe me, palm oil IS saturated oil and that's no good no matter how much carotene or whatever the food scientists the palm oil people pay to tell you) and when your wooden chopsticks sizzles when you dip them into the oil, or a piece of breadcrumb immediately rises to the top of the oil, you can fry the breaded meat. Reduce the heat to medium when the cutlet goes into the oil. It takes about 2 minutes to cook both sides. Fry the meat individually to maintain the heat.

6. Remove the cooked cutlets onto kitchen paper to drain and cut into 2 cm slices and arrange neatly on a plate or over the cabbage.

Wednesday, October 7, 2009

This Boy Called Wey

(Thanks to William and Connie, who both wrote to tell me that there's only a Geography paper on Friday. Both Math papers are on Monday. My mistake in reading the timetable...)

Wey is writing his first PMR paper today. It'll be Bahasa Malaysia Papers 1 & 2. To brighten up his mood, I'm foregoing a healthy diet and cooking whatever he wants this week. Last night was ox tail stew (the best, so I am not willing to part with the recipe. Yet.). He wants pork tonkatsu tonight. He writes his English and Science papers Thursday, and Math 1 and Geography on Friday. The menu will be decided as and when, he thinks. I am ready to cook him anything, as long as he tries his best this exam! Chinese didn't become nerds these last 50 years. It's in our blood, since thousands of years ago when poor peasant parents sold everything to make way for their sons (girls not allowed) to be given the chance to write the imperial exams in the Chinese capital. If one village turns out a scholar, the whole village rejoices because it means life will be better as the scholar will be given a ministerial post serving the monarch. Education was the key out of their poverty, and this thinking is ingrained into every generation so that studying is now a trait among the Chinese. Since it was almost a life and death thing (as depicted in the movies, the pressure on imperial exam students must be thousands of times worse than what our kids go through. Those who fail either kill themselves or not return home, out of shame), eventually the exams became corrupted with cheating as students were willing to do anything to pass. Also because the exams were so focused on passing rather than learning, the Chi nese became rote learners, memorizing without understanding. I didn't make this up. Apparently, Dr Sun Yat Sun (American-educated, haha) noted this and told the British, to their discomfort, that their education system was modeled after the ancient Chinese imperial exams of passing through rote learning. Much of Asia is still using this system, no thanks to the Chinese. And the colonial British. In fact, now it's not just passing, but how many As you pass the exam with. And to some, it's not how many As you achieve but whether it is straight As.

Wey turns 15 this coming Saturday so it's a present from the Education Dept that no papers are scheduled on that day. Monday will be Math 2 and Sejarah (history) and Tuesday, KH (home skills). And then WE are done for the year! I will update now and then, if I can. You see, Wey isn't the only one writing the PMR. I am too. I have been making him do revision papers. If I'm not seated next to him, he won't do revision. I got up early this morning to make him a good breakfast. He was scuttling around in the dark (there was a heavy downpour and the lights went out) looking for his pens and stuff this morning. Last minute, as usual. And when he had left, we realized he hadn't brought his watch. I hope they have a clock on the wall...And now, excuse me while I go pick up the imperial scholar from school.

Thursday, October 1, 2009

Home-made Hot Sauce

chili sauce1
Home-made hot sauce is not red like the commercial ones.

Habaneros and chili padi ('rice chili', because of their tiny size) are the hottest chilies I've ever eaten. Chili size and their level of hotness are inversely related. Big bell peppers taste sweet instead of hot. The smaller the chili, the hotter it is. Shorter people are like that too. The shorter the more fiery. According to a National Geographic program recently, small animals are more colorful to attract mates and ensure survival and propagation of species. It may be the same with shorter people, who are usually more animated, extroverted, wily and capable so it's no wonder the nickname "chili padi" refers to a small person with big fighting spirit.

chili padi
Birds' eyes chilies, also known as chili padi

kasturi limes
Kasturi limes, also known as calamansi

I have a couple of chili padi plants in my back yard. Recently, there are so many chillies even the birds can't finish them so I decided to make chili sauce, Sabah-style, something I've not bothered to do before.

I washed, dried and blended the chillies with plenty of kasturi (calamansi) limes (remove the seeds but keep the skin) and seasoned the sauce with some salt. I didn't want any extra flavor like ginger or garlic in it, so I left it plain. The sauce was more of a paste, so I added some rice vinegar to thin it a bit, but not too much since I like to add some Maggi soy sauce when I use it as a dip. I don't have much experience in pickling anything. I scalded the bottles with boiling water so I hope the chili sauce will keep for some time. That's all my understanding about pickling and preserving; just make sure the bottles are clean and dry.

All that chilies and limes made two small bottles of thick hot sauce. I also suffered from some chili burns on my hands and face but it was worth it. The kasturi limes give a refreshing citrus flavor and the sauce is so hot, it burns my stomach. I find myself hesitating before I eat it. It is almost like a dare. I imagine that's how it feels for guys to get close to Megan Fox. Hot yet scary.

chili sauce

P1330488

I'll be eating a lot of fried meehoon with my hot sauce, especially the plain white meehoon from the breakfast stall next to Diamond Restaurant.
Related Posts Plugin for WordPress, Blogger...