Sunday, July 24, 2011

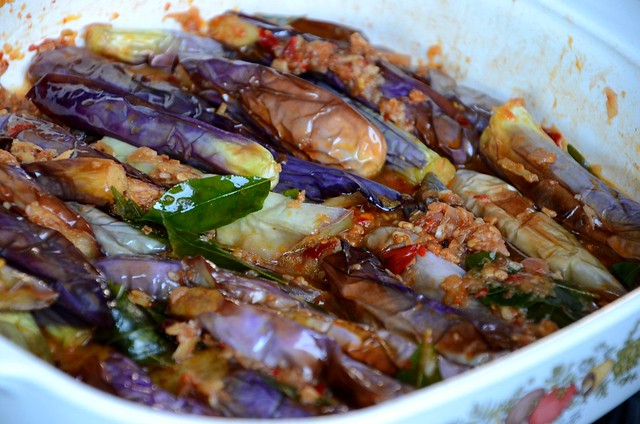
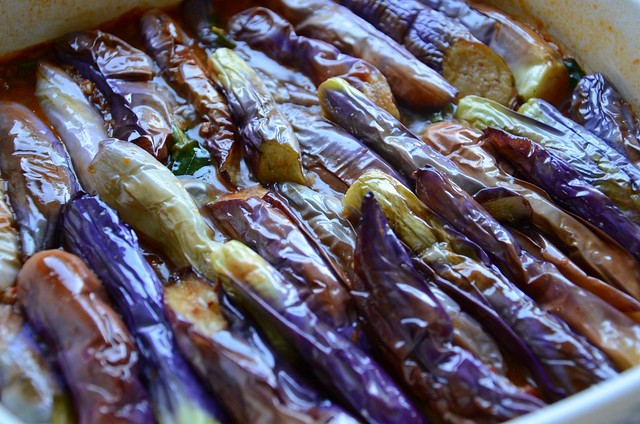
Brinjals Alba

DSC_1626_1280x848

I ate this dish at a pot luck dinner a few months ago and thought it was the best dish that night. Just when I wanted to call Flora for the recipe, I bumped into her at the wet market. She ranted off the ingredients and I ran home to cook the dish for some special guests visiting from Holland and the States. It was a hit with my guests although I didn't taste it myself.

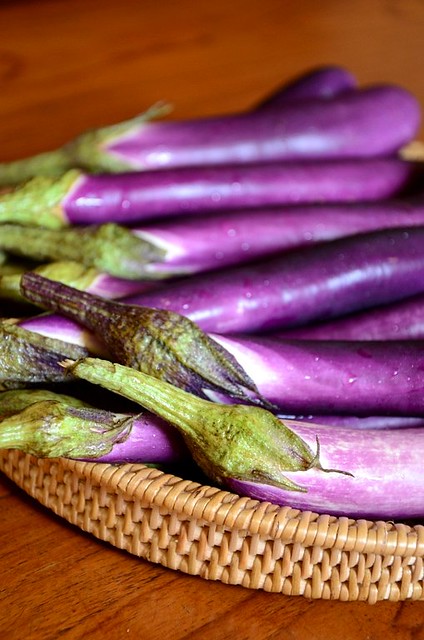
Brinjals are delicious and I prefer them to eggplants for Asian cooking. Brinjals are narrow and long with a thin skin and soft flesh while eggplants are large, bulbous and have thick skin and firmer flesh. The two most common brinjals here are the 'curry' brinjals with thick, deep purple skin and plenty of seeds and the Taiwan brinjals which have a lighter, thinner purple skin, soft tender flesh and very few seeds. Taiwan brinjals are very good steamed and topped with crispy fried red onions or garlic, the oil the garlic/onions were fried in and light soy sauce, Maggi seasoning sauce being the best for this dish. I love brinjals stewed with salted fish but with all the talk about salted fish having Ridsect sprayed on them (I have seen it myself) to ward away flies, I use canned anchovies and although the dish is not the same, it is delicious.
DSC_1594_509x768

I bought some baby brinjals recently and cooked Flora's recipe but it turned out that the baby brinjals were too tender for this recipe. I would stick with the regular mature brinjals and use baby brinjals for steaming instead. I was told that this is an Indian-Malay dish and that cuisine is quite alien to me (I do love it once in a while, especially the roti canais and the curries), I'm naming this dish brinjals alba, after the alba seeds used. Of course if you google that you'll get a photo of Jessica Alba, one of the prettiest faces in the world.

The amount of ingredients can be adjusted to your taste and in fact you should experiment with this dish because the recipe here is a rough estimate. This dish goes well with plain rice and maybe a curry or a fried fish. YUM.
DSC_1610_1024x678
Brinjals Alba (for 5 to 6 persons)
1 kg brinjals
8 small red onions (shallots), chopped
8 cloves of garlic, chopped
5 (more/less) dried chilies, washed and soaked in hot water until soft
1 piece thumb-sized ginger, smashed

1 T alba (brown mustard seeds)
3 to 4 sprigs curry leaves, washed & stripped from the stalks

1-2 T (to taste) assam jawa (wet tamarind seeds)
1-2 t caster sugar
salt to taste
3/4 cup light chicken stock

Optional: small handful of dried shrimps, washed and soaked for 5 minutes to soften, then chopped finely. Save the soaking water.

1. Cut the brinjals into 2 or 4 lengthwise and then into 2 crosswise to get thick long slices.

Pound the ginger, onions, garlic and chilies in a mortar into fine paste. If the amount seems too little, make more. There should be about 4 tablespoons for 1/2 kg brinjals.

Put the assam jawa into a small bowl, add about 1/4 cup warm water and massage the seeds until the water is thick. Strain juice through a small sieve and discard the seeds and pulp.

2. Heat up 1 cup of veg oil and fry the brinjals in batches until golden brown. Drain on paper towels. Note: I think that the brinjals can be brushed with oil and roasted in the oven too. It'll be healthier that way.

3. In a casserole dish (if serving in it) or frying pan, fry the pounded ingredients (if using dried shrimps, add that too) in 2 T of oil until fragrant, about 3 minutes.

4. Add the alba seeds and curry leaves, fry for a few seconds and then add the assam juice, sugar and salt to taste. Pour in the stock and water from soaking the dried shrimps, stir well and when sauce is slightly thickened, add the fried brinjals. Season with salt and sugar. Cover and let simmer (low fire) for 5 to 7 minutes. Carefully lift the brinjals from the bottom to the top so that those brinjals at the top will have a chance to soak in the sauce too. Taste and season if necessary. Let cook another 2 minutes before turning off heat. Good to let it sit and re-heat for better flavor.

Tuesday, July 19, 2011

Gong Bao Ji Ding

DSC_1290_509x768

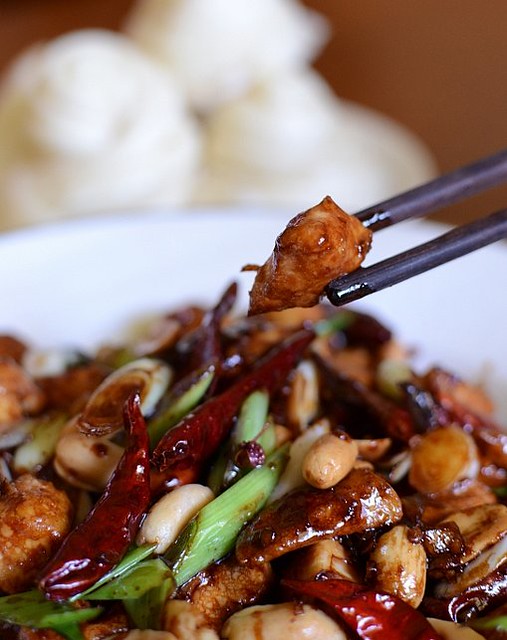
The spicy Sichuan dish gong bao ji ding (Gong Bao's--whoever he was--chicken bits) is equivalent to the Cantonese gu lao rou (sweet and sour pork) in terms of popularity. Chinese restaurants in the USA in particular will without fail have gong bao ji ding, gu lao rou and beef with black soy beans on their menus.

I used to cook this dish until I taught my MIL who then cooked it so well that I gave up cooking it. Through the years however, MIL's gong bao ji ding has evolved according to my FIL's taste and she now makes the dish a mild version with lots of soy sauce, Shanghai-style, so recently I started cooking my version again and since she doesn't read my blog, I'll declare that my version is not only better than hers but also better than all the restaurants in this town because their gong bao ji ding are a black sticky mess of burnt chilies and a few chunks of chicken. I dare say that this recipe is so fool proof that there's no need for tweaking. You just need to know how to fry the ingredients to get them at their best flavor and texture.

DSC_1314_1024x678
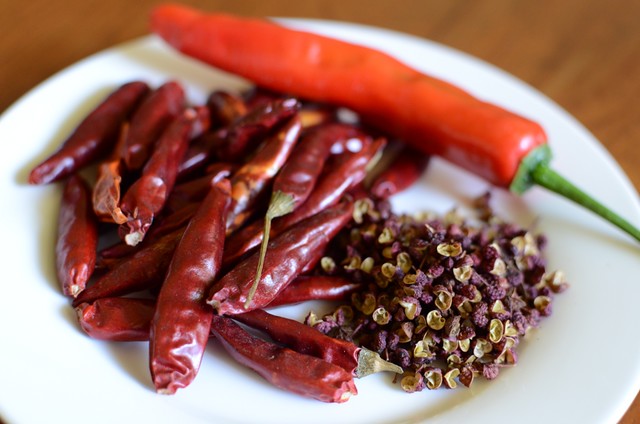
Sichuan dried chilies are smaller than our red chilies and much hotter too. Next to the chilies are Sichuan peppercorns, best if straight from Sichuan because they loose their fiery numbness with time and bad storage. The peppercorns should be kept in a glass bottle in the fridge.

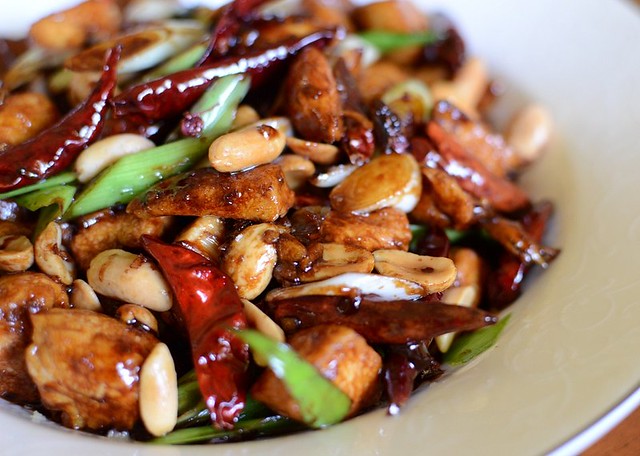
What makes a gong bao ji ding better than just good? Firstly, it must not only taste good but look right too. By that I mean the dish must look dark, not pale, and the sauce must be thick, not watery yet not starchy. Secondly, chicken chunks should be small so that there's greater surface area for the sauce to coat and for that, the sauce must be caramelized enough to cling to the chicken. If the sauce is thickened mainly by cornstarch, it will not have that caramelized soy sauce flavor and thickness. I do add a very small amount of cornstarch to hasten the thickening but not so much that the sauce is starchy. Thirdly, the chilies--preferably Sichuan dried chilies because they are packed with heat and capsicum fragrance--must be done just right: crispy yet not burnt. I'm not particular about the Sichuan peppercorns; this dish is good even without those numbing explosives. Fourthly, the nuts. Some restaurants, especially the upscale ones, use cashew nuts instead of peanuts. I've tried using cashew nuts but found that the dish is far better with peanuts. This is a dish that you pick at with chopsticks, savoring the sauce-covered chicken or leeks or nuts and perhaps washing them down with a cold beer. Cashew nuts just fill the stomach up too quickly compared to peanuts. Finally, the chicken. Even when you get the sauce right, you fail if the chicken turns out tough or dry. To make sure that doesn't happen, marinade the chicken in egg white and cornflour a few hours ahead of cooking and do not overcook. I like to use chicken breasts for this dish because they are very tender when cooked right. Also, keep to the exact amount of chicken and other ingredients. If you want two portions, fry each portion separately. I've tried the easy way out once or twice, using more chicken and other ingredients instead of frying in two batches and while it's okay, it's not superb. Follow the recipe and you'll get a super superb gong bao ji.

Gong bao ji ding is best piping hot and I like to cook it when my guests are seated at the table. It's a simple dish but you may need to practice cooking it before it's perfect.

DSC_1285_1024x678
Gong Bao Ji Ding
250 gm skinless chicken breast (one side of a large breast)
3/4 cup dried chilies (if big, cut into 3 cm lengths)
1 t Sichuan peppercorns (optional)
3/4 cup Chinese leeks, cut diagonally about 2 cm long
1 large handful (50 gm) fried peanuts
2 t finely chopped garlic
2 t finely chopped ginger

Chicken marinade:
2 t cornflour
1 small egg white
a few shakes of white pepper
2 T rice wine
1/4 t of salt

The sauce:
1/2 T white rice vinegar
1 1/2* T black soy sauce (Lee Kum Kee is good)
1 1/2 t castor sugar
1 1/2 T chicken stock or water
1/2 t cornflour
*or 2 T if you like a darker dish
--mix all the sauce ingredients together until the sugar is dissolved

1. Cut the chicken breast into small chunks, about 1.5 to 2 cm square. Massage marinade into the chicken with your hands, cover and leave in fridge for at least 1 hour.

2. Heat 1 cup veg oil in a wok, add the chicken and spread it out into a single layer. When chicken has turned white at the sides (high heat), turn over and stir. Do not overcook. I check by cutting one piece of chicken with the frying ladle. It should take about 1 minute only, less if the fire's very hot. Remove chicken onto a plate, leaving the oil in the wok.

3. Pour away the oil into a metal or ceramic bowl until about 3 T is left in the wok.

4. Fry the chilies, in very low heat, until crisp but not burnt (be careful, dried chilies burn quickly). Remove. Pour away all the oil because it is chili-hot. You can keep the chili oil for other dishes.

5. Add 1 T of the oil used for frying the chicken to the same wok (this IS a greasy dish; be brave) and throw in the leeks, stir until they turn bright green. You can remove the leeks onto the chicken or push them aside in the wok and proceed to the next step. Add the garlic, ginger and Sichuan peppercorns (if using) to the wok, stir a couple of seconds. Pour the sauce into the wok, stirring all the time at high heat. When the sauce is very dark and thick, add the chicken, chilies and leeks, stir quickly, then add the peanuts and dish up. That's it. Serve straightaway.

Sunday, July 17, 2011

Flower Buns

DSC_1319_800x530
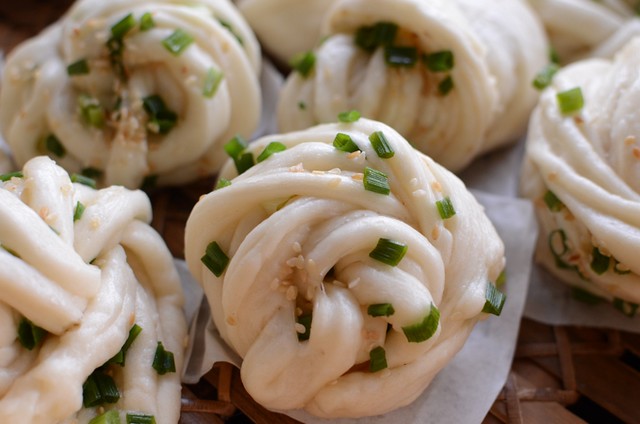
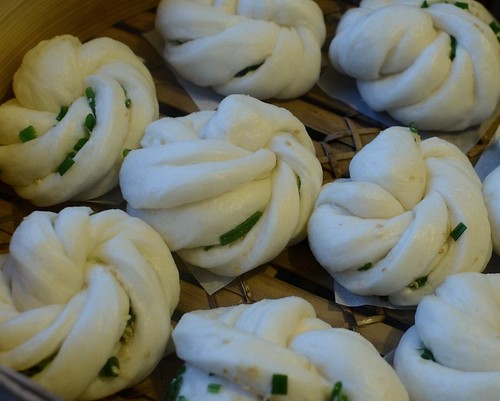
Flower twist buns (hua juan) with spring onions, salt and sesame seeds.

DSC_1269_800x530
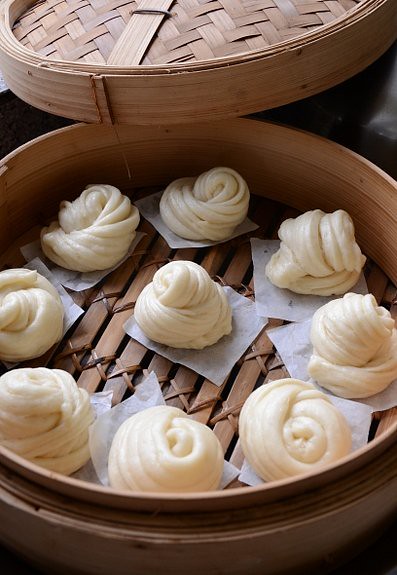
Plain flower buns.


DSC_1379_1024x678
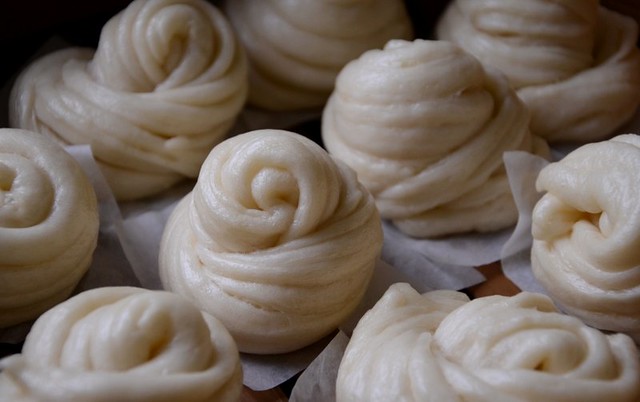
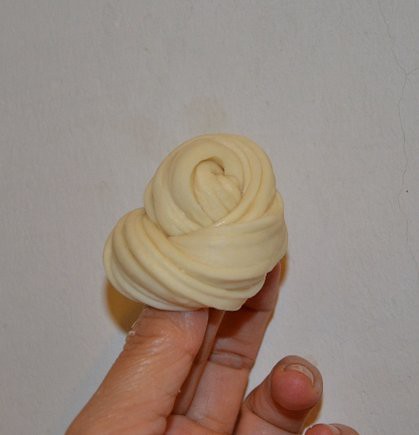
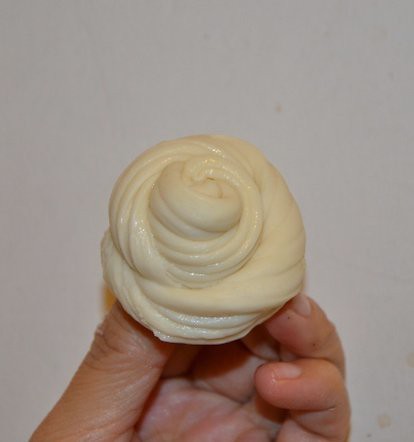
The most common--correct--way to shape the flower buns is shown in this video and the buns look like these. Basically you twist the bun like I did but do not pile it high:

I know I've posted on mantou (Chinese buns) before but there's a good reason for re-posting: improvement to the recipe and a new way of shaping the buns, which I came up with based on the shape of the buns I ate  at a local restaurant.

The amount of water was too little in my previous Chinese buns recipe. Maybe it's true that some chefs don't teach you everything or reveal the full recipe. I've been testing and improving the basic bao recipe which I learnt in a bao-making course years ago and I found that if I add a lot more water to the original recipe, the buns will be softer and moister. I also don't bother to get special bao or Hong Kong flour, both of which are very fine and white (read: bleached) flours. I am sticking to plain flour, and I particularly like the good old Rose Flour for making Chinese buns. Rose Flour is not highly bleached so it gives a yellowish tint to the buns but the fragrance of the flour will more than make up for the less-desirable color. Last week, I had a craving for home-made (read: ammonia-free) buns. Home-made buns are good when just out of the steamer but once they cool, they loose some of the softness because ammonia and other additives are not added to the dough. The point of home-made food is to avoid all those commercial chemicals as much as possible but if you insist, then get Hong Kong flour or bao flour which will give a finer and softer texture. The dough must be kneaded very well, preferably with a machine. I've not had good results making dough with my hands in the past but because my cake mixer is still not repaired, I had to use my hands and the buns still turned out soft so I think if you keep to the amount of flour in the recipe, kneading by hands still gives good results.

I've updated my Chinese buns posts--the baos, the mantou and flower buns recipes are one and the same. Now get a packet of plain flour and practice making plain buns to go with one of my best recipes: spicy gong bao chicken, coming up next.

DSC_1262_397x600

Flower Buns (makes 10 large or 15 to 18 small buns)

A Ingredients:
1 tsp dry yeast
2 Tbsp water
-mix A ingredients together.
(Sshh...if you know your yeast is active, just mix A and B ingredients together at once. I do that all the time)
B Ingredients:
350g Bao or HK flour or Rose (plain) flour
1 tsp double-action baking powder
50g (or less, say 30 g) fine sugar 
200 to 250 ml water* (amended)
1 Tbsp shortening (Crisco) or veg oil

*If you use 250 ml and you are kneading by hand, add 200 ml first and knead in the remainder slowly, 10 to 15 ml each time, so that the dough is not too sticky to handle. Depending on the type of flour, you may not need all the water.

1. Sift the flour and baking powder together (usually I don't bother if the flour is fresh). If using shortening, rub it into the flour evenly.

2. Mix A with all the B ingredients in a mixer bowl and knead at medium speed till very smooth, about 6-8 minutes. The dough should be quite soft. Never mind if it's slighty sticky. Continue kneading until it isn't sticky. If kneading with hands, put dough back into the bowl and cover with a cloth. Rest for 30 min or until doubled, depending on room temperature.

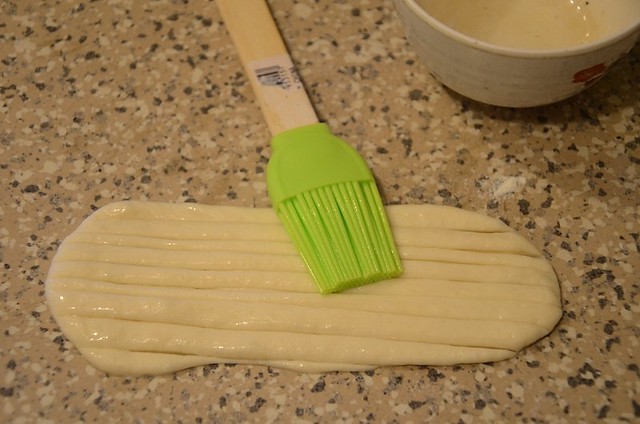
3. Divide dough into 50g portions for larger buns or into golf-ball portions for dainty buns.  Dust your hands and the work surface lightly with some flour. Sometimes I don't because this dough doesn't stick. Flatten each ball, roll into a small oval shape as long as your hand and about 3 to 4 cm wide. Use a metal pastry cutter and cut the dough into thin strips of 1/2 cm, thinner than that if you are making mini buns.

DSC_1238_800x530
4. Brush the cut strips of dough with veggie oil.

5. Take the ends of the dough, one end in each hand, and twist around your thumb and tips of your forefinger.
DSC_1249_800x530
6. Stretch the dough by pulling gently as you twist it around the tips of your thumb and forefinger. Tuck the end underneath the bun by pulling the last bit down to meet the other end that's at the bottom. Got it?
DSC_1250_800x530
7. Here's how it looks from the top: a tight coil, like a chignon. I feel so clever that I figured this out. It must be from playing with my daughter's long hair.
8. Place the buns on a small square of baking paper to proof. Let the buns proof for 30-45 minutes or until doubled. Do not overprove or buns will wrinkle when steamed.
9. Steam at high heat for 4 minutes for small buns, 5 to 6 minutes for larger buns. A bamboo steamer basket gives best results because the steam can escape instead of dripping onto the buns and messing them.
Note: To make flower buns with spring onions (Lily from Jiangxi told me that this is how her dad makes the buns), mix finely-cut spring onions, salt and veg oil or sesame oil and spread over the rolled out dough. I used sesame seeds too for extra flavor.

Friday, July 15, 2011

It's Spam

I got a message purported sent by my pastor through www.myZamana and opened it. After logging in, I suspected it was spam but it was too late. Many of you wrote to ask; you are smarter than me. Please don't open it!

Thursday, July 14, 2011

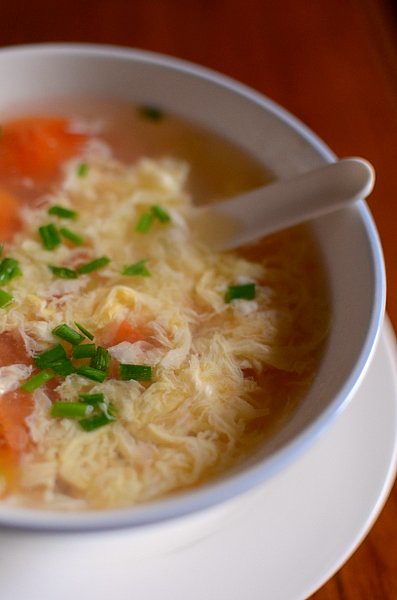
Tomato Egg Flower Soup

DSC_0967_397x600

A Chinese meal is not complete without a soup. Most quick Chinese soups are thin and rather bland because such soups are for refreshing the palate in between mouthfuls of food, and also to moisten the throat and help glide rice down the gullet. Many kids and older Chinese cannot swallow their rice without spoonfuls of soup. When they were toddlers, my kids survived on good nutritious soups and bowls of rice.  Simmered (usually 2 hours) Chinese soups are also thin but fortified with veggies, herbs, bones and meat into very nutritious and delicious soups. Such soups are drunk all through the meals with constant refills. Soups served at fancy banquet dinners on the other hand are always thickened with cornstarch to give them more body (and I suspect to cater to western palates) and are served as a one-off item at the beginning of 10-course dinners.

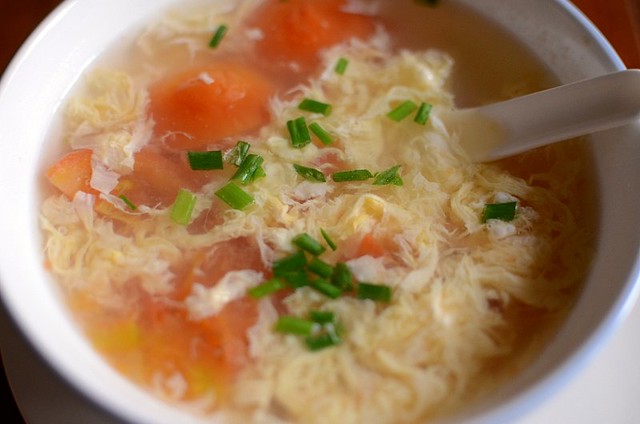
The tangy, oil-free tomato egg flower soup counters the greasy richness of meat dishes very well. Fan jeh dan hua tang, word for word, means tomato egg flower soup. The flower refers to the delicate strands of egg that float in the soup. Dan hua tang is good for emergencies when a soup is needed on the table. Only eggs and good chicken stock (make your own from chicken bones, or use instant canned stock) are required. Tomatoes are the most common ingredient to add to egg flower soup. My mom adds dried shrimps to her egg flower soups too, to give extra flavor.  For a slightly richer and more substantial version, ground meat, jai chai (a preserved veggie) and thin glass noodles can be added too. Whichever way it's done, the important thing about dan hua tang is that the egg strands should be wispy and light, not clumpy and tough. To get fine wisps of egg, the beaten egg must be poured into very hot boiling soup with one hand and stirred in a circular motion with the other hand at the same time. The soup must be very boiling hot or the eggs will not set immediately and so will cloud the soup when stirred. Watch out too that the soup must not be boiled after the egg is added, or the egg will be hard. When your egg strands look like fine cirrus clouds, you have mastered the making of the egg flower soup.

Do not confuse egg flower soup with egg drop soup. A lot of Chinese menus say egg drop soup when they mean egg flower soup. Egg drop soup, as far as I know, is a European soup.

DSC_0972_800x530

Tomato Egg Flower Soup

3 medium-sized very ripe tomatoes, cut into thin wedges
2 eggs, beaten
1 T finely cut spring onions
4 cups chicken stock (from bones or can/granules) or water
1/2 cup ground meat (chicken or beef or pork, seasoned with salt & pepper)
1/2 t salt & shakes of white pepper
1 t sesame oil (optional)
2 T cornstarch mixed with 3 T water (optional)

1. Bring the chicken stock to a boil and add the tomatoes. If using water, add the tomatoes, bring to a boil and add the ground meat, stirring and whisking with a fork or pair of chopsticks to separate the meat so that there are no large clumps.

2. When the soup comes to a full boil again, switch off the heat and pour the beaten egg with one hand and  stir the soup quickly with a fork in circles. Don't pour too quickly or large thick ribbons of egg will form. Make sure the soup is boiling hot or it'll become cloudy. You can switch off the heat in the middle of boiling but do not boil after all the egg is in.

If you want a thicker soup, add the cornstarch mixture (adjust the amount to your liking) before adding the eggs, stirring eggs in using a fork in circular motion. Let soup come to a full boil after adding the cornstarch water, switch off the heat and add the egg, doing the same motion as described above.

3. Season the soup with salt and pepper. Sprinkle the spring onions on top. Drizzle with sesame oil if using.


Related Posts Plugin for WordPress, Blogger...