Monday, May 30, 2011

Duck Breasts In Hoisin-Plum Sauce


P1470862
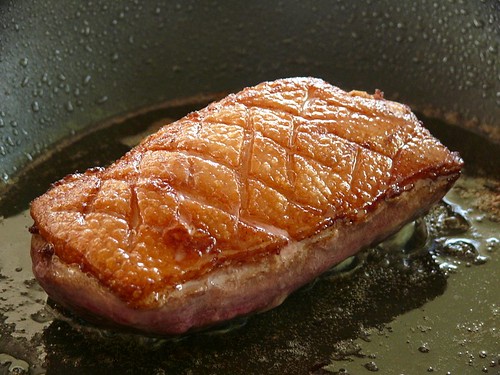
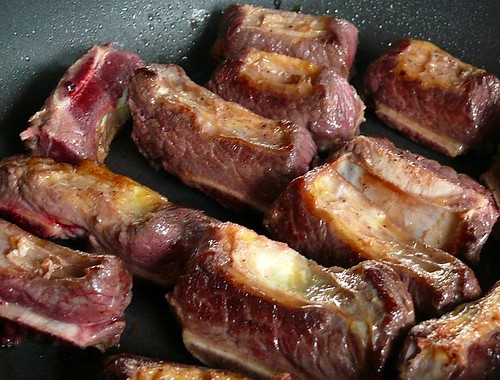
Pan-fried to render the oil and finished in the oven to crisp the skin.

P1470873
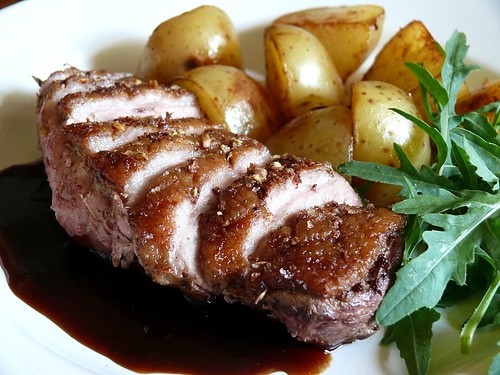
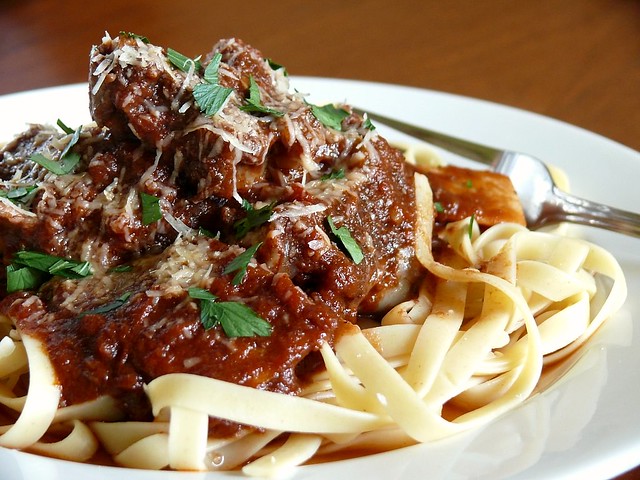
Duck breast with hoisin plum sauce.

P1470888
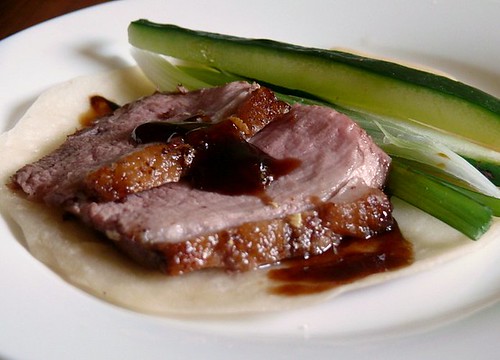
Duck breast on pancakes, a la Peking Duck style.

Today's a public holiday, the Ka'amatan or Rice Harvest Festival. For lunch, I cooked duck breasts with hoisin-plum sauce. This was the second time I cooked duck breasts. It was only recently that I found duck breasts at Hong Seng, the cold storage mart in Damai. At about RM8/USD2.60 per piece, duck breasts are  much cheaper than beef or lamb. And easier to cook and fancier too.

The first time I cooked duck breasts, I pan-fried them until they were nearly done. The meat was slightly pink, moist and sweet. This time, I decided that frying four breasts in two batches just takes too long so I fried them until half-done (7 minutes each side) and finished them in the oven. However, I was distracted and the breasts were in the oven for a good 20 minutes instead of 7 minutes. Duck breasts, as you know, are best slightly underdone. Anyway, although the duck breasts were a slight disaster, my Peking duck pancakes were good--  they popped apart. That was great, because I've always had difficulty pulling the pancakes apart. Now I know that the reason my pancakes were always stuck together was because they were underdone. That, or maybe because they used to stick together because I've always used my finger to smear oil on the pancakes but this time I used a brush. Oh, and another good thing about today's cooking experiment was that I found that potatoes fried in duck fat is heavenly! I saw cans of duck fat in Europe and imagined that they were rather gross, but oil rendered from the duck breasts didn't smell ducky at all and somehow made better potatoes than even butter. Wow. I actually preferred the potatoes in duck oil to the duck.

Duck Breasts In Hoisin-Plum Sauce
One breast per person is good. Score the skin (for easier rendering of the fat) and pan-fry the breasts, skin-side down, two each time, without any oil in the pan. In no time, the breasts will be swimming in oil. Halfway through, after 7 minutes on each side in medium heat (I actually cooked the breasts on low heat but I think medium heat will render even more fat out and make the skin crispier), season the breasts with coarse salt and pepper (black or white or even Sichuan peps is good), pop the breasts into the pre-heated oven at 200 C for another 7 minutes or so. Remove and let rest for 5 minutes. Slice thinly (mine were too thick). Spoon some sauce onto a plate, place duck slices over the sauce and serve. If serving with potatoes, boil the potatoes until just done, cut into smaller pieces and then fry in the rendered duck oil until golden. Season with salt and pepper.

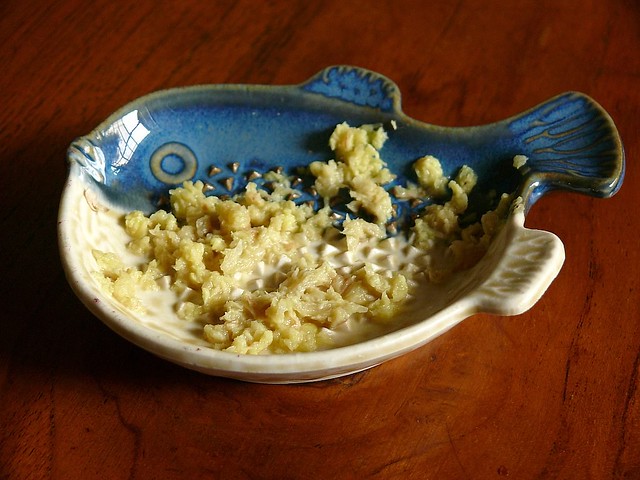
For the sauce, just heat 1 spoon of hoisin sauce with 1/2 spoon of plum sauce for one breast.

Peking Duck Pancakes
1. Put 1 cup plain flour into a bowl and add 1/4 cup boiling water. Stir quickly with a pair of wooden chopsticks or fork, until small lumps form. After 30 seconds of cooling, gather dough into a ball and knead until smooth. If too sticky, add more flour and if too dry, add a little bit more water. Cover and let dough rest about 30 minutes.

2. Roll dough into a long cylindrical shape and break into even number of small pieces about twice the size of your thumb. Dust well with flour.

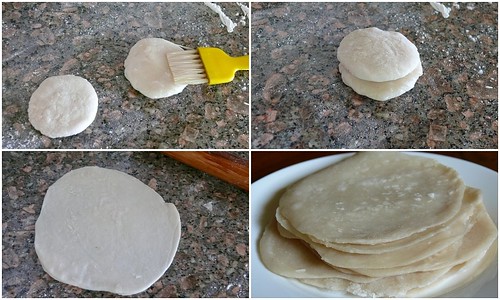
3. Take two pieces of dough, roll each into a ball and press to flatten into a disc/circle. Brush oil liberally (veg or sesame oil) on one disc and press the other piece on top, placing it slightly askew so that it'll be easier to see when you pull them apart. This is a very clever space-saving way of frying two pancakes at once, allowing more pancakes to be fried.

4. Roll (make sure not to press too hard or pancakes'll not pull apart easily) into a thin pancake and fry, without oil, in a non-stick pan until it turns slightly transparent on both sides, about 1 minute each side over low heat. Do not fry until golden or scorched. When cool, pull apart. Keep covered with a cloth as you work on the rest of the dough.

147_PANA3_1024x614


Friday, May 27, 2011

PW's Short Ribs In Tomato Sauce

P1470856_1024x768

That PW. She takes awesome photographs. She surprised herself by marrying a rancher. She helps deliver the cattle babies. She grows veggies and flowers. She keeps basset hounds. She remodeled her guest house, plank by plank. She keeps the house, apparently with no help. She washes. She cleans manure off boots. She homeschools her children, all four of them. She writes one of America's most popular blogs. She recently published a cookbook and a children's story book. She keeps her handsome 'rugged and virile' Malboro Man happy. She does more but I can't keep count. She's one of those people who gets 48 hours out of her 24-hour day.

She cooks too, did I tell you, not for the photographs as many food bloggers do, but to feed her brood so they grow big, strong and happy. She has at least three hands, because she can cook and take photos of herself stirring and whipping. She's funny and she laughs at herself and everything. To me, PW's draw is her fun and funny attitude towards cooking. She's a seriously good cook but she's doesn't cook seriously. So what if the souffle failed--Charlie the basset hound has risen from the (almost) dead. So what if dinner's burnt--the fire in the field has been put out and her virile man (check him out, he does look like a Malboro ad man) is home. That's what's so endearing about PW. She really is about the life in her years, not the years in her life. She's a superwoman. I want to live on her ranch too. But I can't so the least I can do is try to cook like her.

Short ribs in tomato sauce is delicious and easy to cook although it does take a long time, four terribly long hours. But it's not so bad because you don't have to stir or check on it because it stews slowly in the oven. If you have a Dutch oven, great. But I don't so I used a glass casserole dish. As PW advised, it's best to cook this dish early the day before so that the fat can be removed after chilling in the fridge. As with all stews, the meat tastes best when allowed to cool down and reheated the next day. Prolonged simmering softens the meat but doesn't let the flavor of the sauce seep in. Cooling and resting will draw the flavors of the sauce into the meat. This recipe is similar to the one that most of us do with lamb shanks except this one is simpler, without celery or carrots. If you like the tomatoes to look red like PW's, cook the stew a shorter time and serve on the same day. Mine went into the fridge for two days and the color deepened but so did the flavor and taste. It was really yum. I can imagine restaurants charging a bar of gold for a dinner of short ribs in tomato sauce. The best thing about short ribs is that it's not as unhealthy as oxtail (which is a top favorite in my  family) and it is cheaper too. You must try this.

PW's Short Ribs In Tomato Sauce (serves 6-8)
1.5 kg short ribs, in small pieces
1 medium brown onion, chopped
4-5 cloves garlic, chopped
1 can 28 oz tomatoes (whole or chopped)
1 can 10 oz tomato sauce (I used 2 heaped T tomato paste + water)
1 cup red wine
1/4 t dried thyme
1/4 t dried chili flakes (omit if little kids are eating)
salt & freshly ground black pepper to taste
oil for frying

Garnish: grated parmesan and chopped Italian parsley
500 gm dried pasta

1. Preheat oven to 150 C. Season the ribs with 1 full teaspoon of salt and some freshly ground black pepper. Put a little bit of oil in a fry pan and brown the ribs in 2 to 3 batches.

P1470812_1024x768

2. In an oven-proof pot, fry the onion and garlic in a little bit of olive oil until transparent. Add the ribs, the tomatoes, the tomato sauce/paste, the wine and the seasoning. If the ribs aren't fully immersed in the sauce, add some water and stir through. Cover the pot and place on middle rack of oven. Cook for 4 hours without removing the lid. Taste and season if necessary.

3. When thoroughly cooled (I left the pot in the oven to cool), place the pot into the fridge to chill so that the hardened fat can be skimmed off. Reheat and serve hot over fettucine or rice or with toasted baguettes. Garnish with some grated parmesan and chopped parsley.


Monday, May 23, 2011

Karaage Chicken

P1470802_1024x768

Karaage chicken is just chicken nuggets, Japanese style. I suppose the only difference about Japanese chicken nuggets is in the seasoning, which is just light soy sauce, sake or mirin and some ginger juice. The coating flour can be corn or potato starch. Cornstarch is the flour of choice for Chinese cooking because it makes very crispy coating that stays crispy longer and doesn't brown as quickly as plain flour. The Japanese seems to prefer potato starch which makes very light, flaky and crisp coating but it doesn't stay crisp too long in humid weather so it's best to serve the nuggets as soon as they come out of the oil. The fried flakes that come off in the oil do taste like bits of potato chips. To cut the grease and freshen the palate, serve karaage chicken with some chilled cucumber slices.

Here's a very useful little gadget that I picked up in Tsukiji Market, Tokyo years ago. It's a ceramic plate that you can use to grate ginger, horseradish, tumeric and so on. The grated ginger is superfine and soft and I can get nearly a whole teaspoon of juice from a little thumb-sized knob of ginger.

P1470806_1024x768

P1470809_1024x768
Only about 7 cm from mouth to tail, this little grater plate is very handy and efficient.

Karaage Chicken
400 gm (2 deboned chicken legs or breasts, skin on is tastier)
juice from a small knob of ginger (size of the first joint of your thumb)
3 to 3 1/2T Kikkoman light soy sauce (to your liking)
1 T sake or mirin
3/4 cup potato starch or cornstarch
oil for frying
serve with: lemon wedges. mayo
garnish: cucumber slices

1. Cut the chicken into small bite-size pieces and marinade with the soy sauce, ginger juice and and sake/mirin for about 20 minutes minimum.

2. Coat each piece of chicken in the flour, pressing firmly to coat well.

3. Heat oil in a wok or fryer and fry the nuggets a few pieces at a time in high heat for about 1/2 minute, then turn down to medium heat to finish cooking. As with all food with flour-coating, a second frying will further crisp the coating or skin  but remember to do that in very hot oil and for a brief half minute or the meat'll dry out.

4. Drain on paper towels and serve hot as an appetizer with lemon wedges, Japanese mayo and cucumber slices.

Friday, May 20, 2011

Cereal Prawns

P1470791_1024x768
Cereal prawns (artificial light gives bad food photos doesn't it), a tasty dish of crispy cereal, prawns, butter, curry leaves and chilies.

This is a simple recipe from a Singaporean TV cooking show that I found on YouTube. I adjusted some of the ingredients to my taste and also peeled half the prawns and left the balance unpeeled just to see which ones taste better. Usually the prawns for this dish are not shelled and yes, my conclusion is that the unshelled prawns taste better. Instead of large prawns, I suggest using medium-sized prawns for their thinner shells because they crisp thoroughly so that the shells can be eaten too, along with the cereal sticking to the shells. Prawn shells are made of chitin which has been found to have health benefits (glucosamine is made from prawn shells and chitin speeds up healing of wounds and skin) so no harm there. This is a delicious but rather rich dish so proceed with caution.

Cereal Prawns
500 gm (10 to 12) medium large prawns, shells and heads on & butterflied
1/2 beaten egg
2 to 3 T cornflour (plain flour in original recipe)
2 sprigs of curry leaves
1 to 2 t chopped bird's eyes chilies (or milder red chili)
1 cup cereal
3 T milk powder
2 T icing sugar
optional: a few shakes of msg
3 T butter

veg oil for frying

1. Mix the milk powder, cereal, icing sugar and msg in a bowl. Marinade the prawns with some salt, white pepper, the 1/2 egg and cornstarch.

2. Deep-fry the prawns in hot oil until very crispy and cooked but do not overcook or prawns'll get tough and dry. Drain well. In restaurants, such prawns can be deep-fried until half-cooked and re-fried upon orders. The second frying makes very crispy prawns that stay crisp longer. If shelling the prawns (remove the shell from the body only, leave the heads and tails on), just shallow-fry both sides in a pan with a smear of oil.

3. In a clean frying pan or the same wok used for frying the prawns earlier, add the butter and the leaves (so that the leaves have more time to crisp) under medium-low heat. When leaves are crispy, reduce heat to very low, add the cereal mixture and stir, until the cereal turns golden and crispy. Be careful not to burn the cereal; they burn easily. Add the fried prawns to mix and dish up. Serve immediately.

Wednesday, May 18, 2011

Kedongdong Juice

P1470786_1024x768
Refreshing kedongdong juice

It's not that I haven't been cooking. I have but since our main meals are dinners and it's the season for afternoon thunderstorms, all my photos came out dark and grainy.

I had a refreshing kedongdong juice three weeks ago in Kuching. This morning I found some kedongdong at the market. They were old with brown skin (age spots?) unlike young kedondong which have clear, clean green skin. My MIL likes to say "Everybody is beautiful at 18". That statement is true with all living things, isn't it? Only antiques get better looking with age. Anyway, the kedongdong. Kedongdong are back-yard fruits not grown commercially so they are not often available. The lady who sold me the kedongdong asked if I was going to "jarok" or pickle the fruits and was surprised that I was going to juice them.

Back in the days when everyone was juicing their cucumbers, celery, carrots and even bittergourds, I resisted the craze. I managed a straight face and shut-mouth when juice-believers swore how juicing can clear the body of toxins and cure diabetes, hypertension and whatever the current disease. My kids never grew up having the luxury of mommy juicing their fruits once a month, let alone daily as expounded by my juicing friends. I also avoid food supplements because I think that's a lazy way to get your nutrients. I have a friend who eats supplements instead of real food and her biceps are flabbier than my 80+ year-old mom's. Anyway, I never believed in juicing because all that fibre is removed and I couldn't resist stirring some back into the juices and of course that didn't make them taste as good and so the kids never craved for juices. Now of course we know that the biggest problem with juices, fruit juices especially, is that you can get too many calories. One orange is about 60 calories so five oranges in one glass is 300 calories. That is a sure way to get fat and diabetic, especially since Asians are predisposed to diabetes. However, once in a while I do love some juice and this glass of icy sweet-tartish kedongdong juice was enough to get me chilled through the hot day.

P1470780_1024x768
Mature kedongdong have a brown-green skin and are about the size of a small chicken egg.

1. Peel the kedongdong. The fruits are so sour that by the time I peeled 12 of them, my fingers were all puckered.

P1470779_1024x768
Mature kedongdong have a spiky fibrous seed while young kedongdong have no seeds but are more sour.

P1470783_576x768

2. Top the juice with lots of ice and a bit of cold water. Add about 1/4 teaspoon of salted plum powder for the ultimate drink. You can substitute the salted plum powder with a small pinch salt and sugar but it won't be as good.

Related Posts Plugin for WordPress, Blogger...