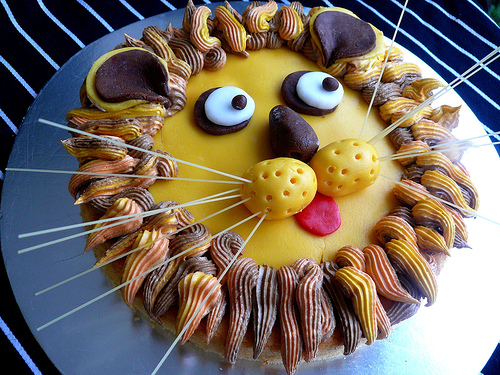
I've had so many requests for the Rory Lion Cake recipe, and with the latest request from a Rachel, I've decided to post the how-to once and for all. Like I said in my first post on Rory Lion, I had copied the cake design from A Complete Guide To Cake Decorating so please do refer to it.
1. Use a round butter cake (or any cake as long as it isn't sponge cake because it would not hold the weight of the icing) of your desired size.
2. Get hold of marzipan or covering fondant/sugarpaste and roll the following shapes out:
i) Make the whites of the eyes using (or use menthos candy if lion's face is small) uncolored marzipan (not as ideal unless it is very white)/sugarpaste. Color 4/5 of the marzipan/sugarpaste yellow, for the face and features. Use a small amount of the yellow marzipan/sugarpaste to roll out a thin circle about 3 cm smaller than the cake for the face. Fix the face onto the cake using a little bit of jam. Use the remaining yellow paste to make ears and the whatucallit under the nose (make the holes with a wooden skewer) .
ii) Take a small bit of the uncolored marzipan/sugarpaste and color it deep red for the tongue. Color the remainder dark brown. Use the dark brown to make smaller circles for the shaded part of the ears, make smaller circles for the eyes and the nose (use skewer to make the nostrils). You can also use some to make the iris of the eyes, or you can use red beans. Use a bit of water or jam or royal icing to stick the features onto the lion's face. When I remember, I like to lift and twist Rory's tongue a little to give a 2-D effect.
iii) Make about 2 cups (depending on the size of the cake) of royal icing and divide into 3 portions. Color each portion brown, orange and yellow. Turn a plastic piping bag (fitted with a large star nozzle) halfway out so that the icing can be placed nearer to the nozzle. Now spoon the 3 colored icing side by side horizontally along the length of the piping bag so that when you pipe, the 3 colored icing will come out together. Pipe short swirls around the lion's face to make the mane. You can leave the sides of the cake free of icing, or you can use buttercream to ice it first before piping the mane.
iv) Lastly, stick uncooked spaghetti of different lengths on the lion's face for whiskers.
Roar!!

9 comments:
"Roar!" You are funny Terri. Its as though you are roaring out of disgust hahahha!
oh no, i'm roaring with lots of ooomph!
So much thought into this masterpiece... even the tongue to give it a 2-D effect! :)
i forgot to bring my handphone. its under my pillow i think. can u help me bring it over when we meet for lunch? see you at the entrance at 1pm :))) thxkbai
i mean, kthxbai
b: :)) it really is an easy cake to make. try making it next monday?
yi: hmmppp!
Wow! thanks Terri, for the detailed explanation. You are indeed a 'fast worker'. Will make this and shall see if my son will 'roar' like you - 'roaring with lots of ooomph!' on his birthday.
Rachel
wow! it is so beautiful!
I just made this cake today! It is fantastic! Just like your picture! And the detailed explanation helped me a lot! Thank you for the idea!
Post a Comment